MQTT Mosquito Installed in Windows

As we know, MQTT is some protocol used for IOT today. There are 3 components involved in MQTT:

  1. Publisher  – It will read the temperature value and publish over the topic such as “temp”
  2. Broker receives the temperature value over a topic such as “temp”. Then, its immediately distributes / sends the value to all the subscribers of the topic “temp”.
  3. All the subscribers of topic “temp” receives the value.

In this tutorial, we will learned on how to install and run MQTT mosquitto broker on windows 10. Credit to this website:

https://medium.com/@shikhar022/steps-to-install-mosquitto-broker-on-windows-10-aec2141d962c

ITEM NEEDED

    1. Please download Mosquitto cygwin build from here
    2. Please download Windows XP build from here
    3. Then, extract the Windows XP build into a specific location in to your system.
    4. Run the Mosquitto cygwin build (from step1) for installation, it will fail the first time but don’t worry, everything is fine, keep following the steps
    5. Now go to the extracted version of XP build (from step 2) and find the following files:

      cygcrypto-1.0.0.dll
      cyggcc_s-1.dll
      cygssl-1.0.0.dll
      cygwin1.dll
      cygz.dll
      libeay32.dll
      libssl32.dll
      msvcr100.dll
      pthreadVC2.dll
      ssleay32.dll

    6. Copy the above files from XP build to the installation directory of Cygwin build which failed in step 4, by default mosquitto will install itself in C:\Program File(x86)\mosquitto.

    7. Now run the cygwin build exe installer again. It will run normally this time. click on Finish.

    8. Run the CMD as administrator. Find the location folder of mosquitto. For example: c:\Program Files\mosquitto>
    9. Run the mosquitto.exe. c:\Program Files\mosquitto>mosquitto.exe

10. To check where it run or not can type: mosquitto -v and the output will be like picture above.

11. We also can check by type: netstat -a (command to find out which all ports are running in the system)

If everything is working fine, you should be able to see the following output:
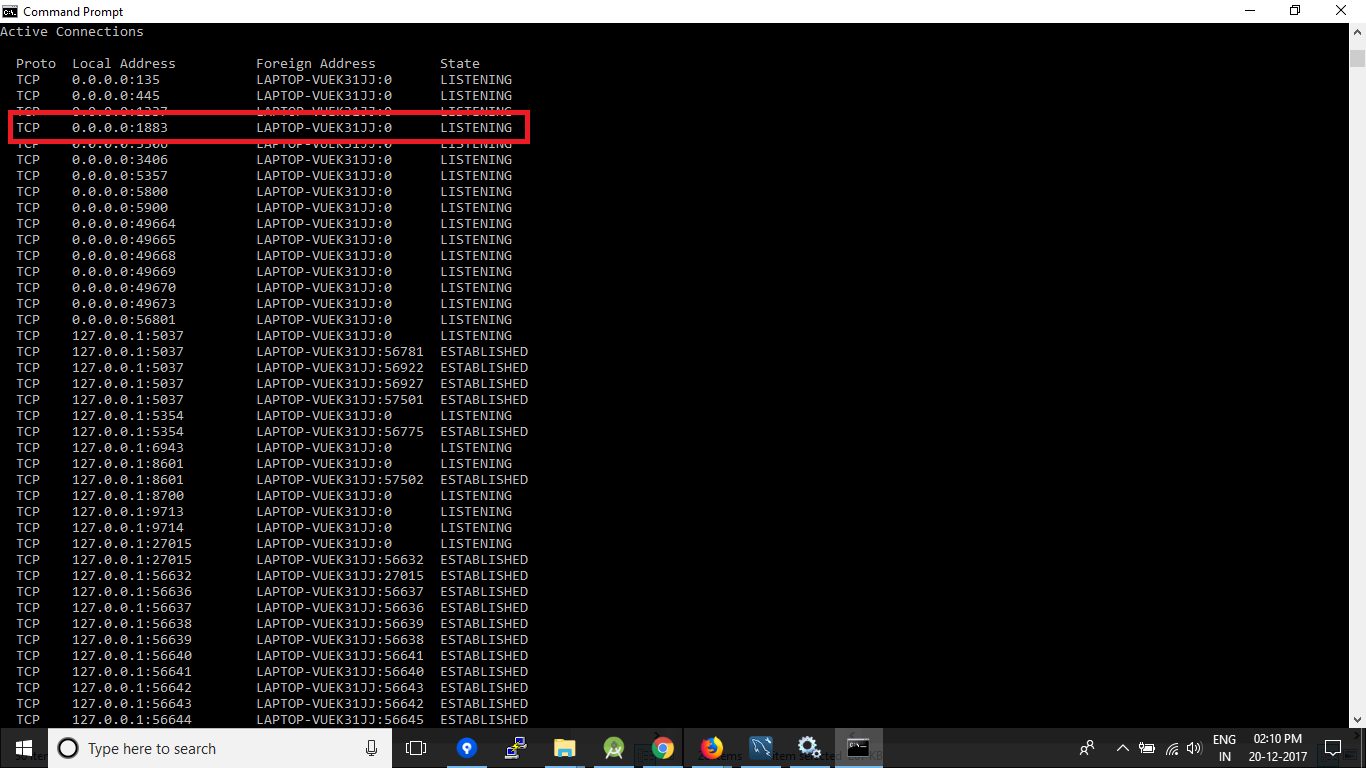
11.  Done


Session 2019/2020

Semester 1

Run Raspberry Pi in Window Desktop 

https://thepi.io/how-to-run-raspberry-pi-desktop-on-windows-or-macos/
How to run Raspberry Pi Desktop on Windows or macOS

Our articles usually show you how to do things on a Raspberry Pi. This time, we’re changing things up: we’re going to show you how to use a PC or Mac to run the Raspberry Pi Foundation’s desktop operating system, Debian with Raspberry Pi Desktop (for brevity’s sake, we’ll call it just “Raspberry Pi Desktop” from now on). This Raspbian-like OS (as the names imply, both operating systems are based on Debian) allows you to use your PC or Mac as a kind of substitute for your Raspberry Pi. That makes it useful for testing out projects when your Pi isn’t handy. It’s also fun because it backs the familiar Raspbian interface with your PC or Mac’s hardware, which is much more powerful than the little Pi.

The simplest way to get Raspberry Pi Desktop up and running is to install the operating system, but that will require you to dedicate a computer to the project (or at least to partition a hard drive). If you want to keep running Windows or macOS on your computer, your best bet is to run Raspberry Pi Desktop on a virtual machine – which is exactly what we’ll show you how to do in this guide.

How to run Raspberry Pi Desktop on Windows or macOS

Step 1: Download and install VirtualBox

Because we’re going to run Raspberry Pi Desktop on a virtual machine, we’ll need to download Oracle VM VirtualBox. In Oracle’s own words, “VirtualBox is a powerful x86 and AMD64/Intel64 virtualization product for enterprise as well as home use.”

You can download the software from VirtualBox’s Downloads page. Just choose the right version for your operation system (there are two: a Windows version and a macOS version). After you’ve downloaded the executable, install VirtualBox by following the installation wizard’s instructions.

Step 2: Download Debian with Raspberry Pi Desktop

Next, you’ll need to download the image file of Raspberry Pi Desktop from the Raspberry Pi Foundation’s site.

Step 3: Launch VirtualBox and create a new virtual machine

Now that we’ve both VirtualBox and Raspberry Pi Desktop downloaded, we’re ready to launch VirtualBox and create a new virtual machine.

Click “New,” and you should see a screen like this:

Create Virtual Machine

We don’t want to create a Windows virtual machine, of course, so let’s change the settings a bit. First, choose a descriptive name for your virtual machine (for example, “Raspberry Pi”), then select Linuxfrom the Type dropdown menu and Debian (64-bit) from the Version dropdown menu. After that, click Next.

On the next screen, you can use the recommended memory size of 1024 MB – this corresponds to the Raspberry Pi 3’s memory size.

The next screen is about adding a hard disk to your new virtual machine. Just click Create, unless you have some reason to modify the settings. Then, click Next on this screen and again on the next.

Finally, you can choose the size of your hard disk. We used the recommended size of 8 GB, but you may want to have a larger hard disk. When you’re ready, click Create.

Now we have the settings of our virtual machine in place.

Step 4: Install Raspberry Pi Desktop

Click Start to start the installation of Raspberry Pi Desktop. You should see a screen like this:

Select start-up disk

Browse to the folder where you saved the image file of Raspberry Pi Desktop, select the file, and click Start. What you should see next is a menu titled “Debian GNU/Linux installer boot menu.” Use the arrow keys – or i – and Enter to select Install.

On the next screen, select your preferred keyboard layout and continue by pressing Enter.

Choose Guided – use the entire disk and keep pressing Enter to Select disk to partition and choose the Partitioning scheme. Finally, Finish partitioning and write changes to disk.

You might want to grab a cup of coffee or tea while the system is installing.

After a while, the installation wizard prompt you: “Install the GRYB boot loader to the master boot record?” Select Yes, and choose /dev/sda.

When the installation wizard has installed everything, you should see a screen like this:

Raspberry Pi Desktop

Look familiar? If you’ve used Raspbian before, it should!

Step 5: Make the virtual machine interactive

Our virtual machine is successfully running Raspberry Desktop now, but the screen size is a bit small, and it doesn’t get bigger when you click Maximize. We can make our machine more interactive by installing VirtualBox Guest Additions. Guest Additions makes it possible for us to resize the screen, use the clipboard, and share files between our PC or Mac and the virtual machine.

To do this, first open Terminal and make sure that your system is up to date:

sudo apt-get update
sudo apt-get upgrade

You’ll have to type the commands because our virtual machine isn’t very cooperative, yet.

Now we’re ready to install VirtualBox Guest Additions:

sudo apt-get install linux-headers-$(uname -r) virtualbox-guest-dkms virtualbox-guest-x11

With Guest Extensions installed, click on the Devices menu and select Shared Clipboard > Bidirectional.

If you rebooted your virtual machine now, you would be able to use the same clipboard on both your PC or Mac and the virtual machine. You would also be able to resize the screen. But let’s not reboot, yet. Instead, let’s first to add our user to the vboxsf group to enable file sharing between the virtual machine and PC or Mac:

sudo adduser pi vboxsf

Now we’re ready to shut down our virtual machine and set up a shared folder. This the shutdown command:

shutdown -h now

Step 6: Set up a shared folder

To set up a shared folder, right-click on your virtual machines name and select Settings…, or press Ctrl+S with your virtual machine selected.

From the menu that opens, select Shared Folders.

Click the button with the green plus sign that adds a new shared folder.

From the Folder Path dropdown many, select Other… and then the folder you’d like to share. When you’re ready, click OK and check Auto-mount.

Add Share

If you start your virtual machine again and launch the file manager, you should see your shared folder with the prefix “sf_” in the /media directory. Any file you put in that folder will also show up in the corresponding folder in/on your PC or Mac, and vice versa.

And that’s it! You now have Raspberry Pi Desktop running on a virtual machine on your PC or Mac, and you can easily use the clipboard and manage folders while you’re working on your next project

Board Members of University Mobility in Asia and the Pacific (UMAP) Visit UTMKL

Kuala Lumpur, 25 April 2018 – UTM Kuala Lumpur received a courtesy visit from Board Members of University Mobility in Asia and the Pacific (UMAP).

UMAP aims to achieve a better understanding of the cultural, economic and social systems of the other countries and territories in the Asia-Pacific region through enhanced cooperation among higher education institutions and to increase mobility of university students and staff.

Delegates were greeted by Prof. Dr. Nordin Yahaya; Pro Vice Chancellor (International) who gave a brief description about UTM and were taken around the campus to visit MJIIT, UTM SPACE and UTMKL Residency.

Ending the program in the afternoon, the delegation was then invited to enjoy dinner at The Regency Scholar’s Hotel Restaurant, Residensi UTMKL.

BENGKEL TRAINING OF TRAINER (TOT) SISTEM MY e-PORTFOLIO UTM

BENGKEL TRAINING OF TRAINER (TOT) SISTEM MY e-PORTFOLIO UTM

FAKULTI KEJURUTERAAN MEKANIKAL

Pihak universiti telah memutuskan pelaksanaan  e-Portfolio sebanyak 80% pada Semester II Sesi 2017/2018 .  Oleh itu, satu bengkel akan diadakan bagi mendapatkan maklumat lanjut dan cara penggunaan Sistem My e-Portfolio UTM seperti berikut:

Tarikh              :           20 Februari, 2018 (Selasa)

Masa                :           2.00 – 5.00 petang
Tempat            :           Dewan Seminar Blok C23

                                     Fakulti Kejuruteraan Mekanikal, UTM Johor Bahru

Aturcara:
02:00 – 02:30   Taklimat Pelaksanaan Sistem MY e-Portfolio UTM

oleh Prof. Madya Dr. Intan Zaurah Mat Darus, Timbalan Dekan Pengajian Prasiswazah (UGS)

02:30 – 05:00    Bengkel Penggunaan Sistem MY e-Portfolio UTM

Fasilitator/Pengajar:

a)    En. Mohd Subha bin Salleh, Perpustakaan Raja Zarith Sofiah (PRZS)

b)    En. Syed Mohd Anwar Alhabshi bin Syed Hamed,  Pusat Sistem Maklumat & Komunikasi (CICT)

3.      Sehubungan dengan itu, semua staf diwajbikan hadir dan bawa bersama lap top masing-masing.  Segala kerjasama yang diberikan didahului dengan ucapan ribuan terima kasih.

SESI PERTEMUAN NAIB CANSELOR BERSAMA STAF AKADEMIK BERUMUR TAHUN DAN KE BAWAH

Tentatif Program
▪9.00-9.15 pg: Pendaftaran
▪9.15-10.00 pg: Sesi Talk DNC
▪10.00-10.45: Sesi soal jawab

Pusat Kepimpinan Akademik UTM (UTMLead) akan mengadakan sesi pertemuan di atas.  Sehubungan dengan itu, YBhg Prof./Prof. Madya/Dr., adalah dijemput hadir.  Maklumat lanjut seperti berikut:

Tarikh      :     7 Mac 2018 (Rabu)
Masa       :     9.00 pagi – 12.30 tengahari
Tempat    :    Dewan UTMLead, Bangunan Pusat Siswazah (F54), UTM Johor Bahru

3.     Sehubungan dengan itu, kerjasama YBhg. Prof./Prof. Madya/Dr. adalah diminta untuk mengesahkan kehadiran ke sesi pada atau sebelum  5 Mac 2018 bagi tindakan lanjut pihak urusetia.

Terima kasih

VICE CHANCELLOR’S 2018 NEW YEAR ADDRESS (JANUARY 2018)

Sukacitanya, seluruh warga Universiti Teknologi Malaysia (UTM) dijemput untuk hadir ke Majlis Perutusan Tahun Baharu 2018 bersama YBhg. Datuk Naib Canselor yang akan diadakan pada 22Januari 2018 (Isnin) di Dewan Sultan Iskandar, UTM Johor Bahru.


Dimaklumkan juga, sebarang permohonan slot perasmian, pelancaran atau sebagainya adalah ditangguhkan pada majlis kali ini, termasuk penyerahan sijil lantikan dan kenaikan pangkat. Hanya penyerahan sumbangan sahaja yang akan dipertimbangkan.
 
Perincian Majlis Perutusan Tahun Baharu 2018 adalah seperti berikut:
Tarikh : 22 Januari 2018 (Isnin)
Masa : 8.15 pagi
Tempat :

i. Dewan Sultan Iskandar, UTM Johor Bahru. 

[LINTAS LANGSUNG]

ii. Dewan Azman Hashim, UTM Kuala Lumpur

iii. UTM Kampus Pagoh.
 

Pakaian:
– Pakaian korporat.

Atur cara:
7.50 pagi : Staf mengambil tempat
8.15 pagi : Ketibaan YBhg. Datuk Naib Canselor
: Nyanyian Lagu Negaraku
: Bacaan Doa
: Tayangan video pencapaian UTM 2018
: Pelancaran Buku Amanat Tahun Baharu 2018
: Perutusan Tahun Baharu oleh YBhg. Datuk Naib Canselor

: Lagu Keunggulan Terbilang
: Bersurai

Segala sokongan dan komitmen YBhg. Prof/Saudara untuk hadir amatlah dihargai.

Sekian dimaklumkan.​​​​

​​

Nota: Majlis Amanat Tahun Baharu 2018 oleh YB Menteri Pengajian Tinggi akan diadakan pada Khamis, 11 Januari 2018 dan akan ditayangkan secara lintas langsung ke UTM.

Ingin berkongsi idea?
Pejabat Hal Ehwal Korporat  / Office of Corporate Affairs
Universiti Teknologi Malaysia
Skudai, Johor, Malaysia

Launching Ceremony Project On ‘Installation Of Rainwater Harvesting System at Masjid Al-Muttaqin, Wangsa Melawati, Kuala Lumpur’

Launching Ceremony Project On ‘Installation Of Rainwater Harvesting System at Masjid Al-Muttaqin, Wangsa Melawati, Kuala Lumpur’

Wangsa Melawati, January 16th, 2018 – Universiti Teknologi Malaysia in collaboration with Green Community, Masjid Al-Mutaqqin Committee and DBKL has launched the ‘Rainwater System Harvesting Installation Project at Masjid Al-Muttaqin’ in Al-Muttaqin Community Hall. The launch of this project was officiated by YBhg. Datuk Hamdan Bin Mohd. Yusof, Pengerusi Jawatankuasa Penduduk Wangsa Maju. Also present was Prof. Dr. Shamsul bin Sahibudin, Pro-Vice Chancellor, Universiti Teknologi Malaysia, Kuala Lumpur Campus.

In reinforcing university strategic thrust which is ‘Outstanding Contribution to Society’, UTM expertise is leveraged in order to meet the community needs. Rainwater harvesting system (RWHS) at Masjid Al Muttaqin was requested by Masjid committee is also supporting government water saving campaign. According to the head of the project, Dr. Aznah Nor Anuar from the Malaysia-Japan International Institute of Technology, UTM Kuala Lumpur Campus, this project also aims to educate the community on sustainable water management as well as provide university students with the opportunity to assist the community with the knowledge they have learnt. The project had received funding from the NBOS Unit, Planning, Policy Planning and Coordination Division, Ministry of Higher Education.

The ceremony started with a talk on ‘Sustainable Water Management from Perspective of Islam’ delivered by Dr. Muhammad Fathi bin Yusof, Research Fellow (Law and Constitution) at Centre of Research for Fiqh, Science and Technology (CFiRST) UTM. Then it was followed by short briefing and video show about the project by Head of the team. In his speech, YBhg. Datuk Hamdan congratulated the committee involved and hoped that the programme would be a pioneer and aspiration to the local community to save on tap water use and be able to build the same system in their respective areas. He also stated that the linkages between the university and the community are also important to ensure project carried out is impactful and beneficial to the people.


Other than the launching event, exhibition booth on RWHS were opened and participated by private companies such as Auralite (M) Sdn. Bhd and I-Control Solutions (M) Sdn. Bhd, as well as related agencies namely the National Water Services Commission (SPAN) and the Department of Irrigation and Drainage (DID) to provide information about importance and benefits of RWHS.


A total of 200 guests were present at the event including the heads of neighbouring masjid, community leaders, NGOs, lecturers, teachers, university students, colleges and schools as well as local communities. The ceremony ended at 12.00 noon.

Collaboration on Software Defined Radio Solutions for future 5th Generation (5G) Mobile Communications between UTM and NI Malaysia.

Collaboration on Software Defined Radio Solutions for future 5th Generation (5G) Mobile Communications between UTM and NI Malaysia.

KUALA LUMPUR, 11 Jan 2017: – Universiti Teknologi Malaysia (UTM) and National Instruments today have signed a Memorandum of Understanding (MoU) to intensify collaboration and partnership in the research and development (R&D) of software defined radio solutions for future 5th Generation (5G) mobile communications. Under the terms of the MoU, UTM represented by their Wireless Communication Centre (WCC), the only recognized Higher Institution Centre of Excellence (HICoE) in 5G research by the Ministry of Education Malaysia, and NI will collaborate on R&D projects utilising NI’s software defined radio and LabVIEW integrated software development environment to enable rapid in house prototyping of UTM’s research and innovation. Both parties will engage in sharing of knowledge on the application of NI’s tools and equipment for 5G R&Ds, and facilitate the exchange of staff and researchers.

The partnership between NI and UTM plays an important role in promoting the industry-academia collaboration, strategically aligned with Malaysia’s Education Blueprint 2015-2025 and UTM Global Plan 2012-2020, with the aim of producing world class research outcomes. NI has a long history of providing a range of hardware and software development equipment, as well as visual programming tools, for test and development professionals. NI is currently collaborating globally with top researchers in leading international research institutions to accelerate the R&D of 5G technology using integrated platform that combines off-the-shelf LabVIEW Communications software and software defined radio hardware. NI will share their expertise and research collaboration experience to accelerate UTM’s discovery in countless 5G innovative applications. The next generation 5G mobile communication technology is expected to be standardised and launched by the year 2020. This new exciting 5G technology will not only support multi-gigabits per second enhanced broadband, but will also support massive internet of things (IoT) and ultra-reliable ultra-low latency applications such as autonomous driving and industrial automation. To address the above mentioned and challenging requirements, new radio and innovative signal processing technology is the key to boost and improve the spectral efficiency and latency of wireless communication. One important goal from this MoU is for WCC UTM, with NI as industry research collaborator, to develop innovative software defined radio solutions that can further improve the spectral efficiency and latency of wireless communications. The MoU document was signed by UTM’s Deputy Vice-Chancellor (Research & Innovation), Prof. Datuk Dr. Ahmad Fauzi Ismail and the Managing Director of NI Malaysia Sdn Bhd, Mr. Rajesh Purushothaman.

Call for papers for International Conference on X-Ray and Related Technique in Research and Industry (ICXRI 2018)

Source: Call for papers for International Conference on X-Ray and Related Technique in Research and Industry (ICXRI 2018)